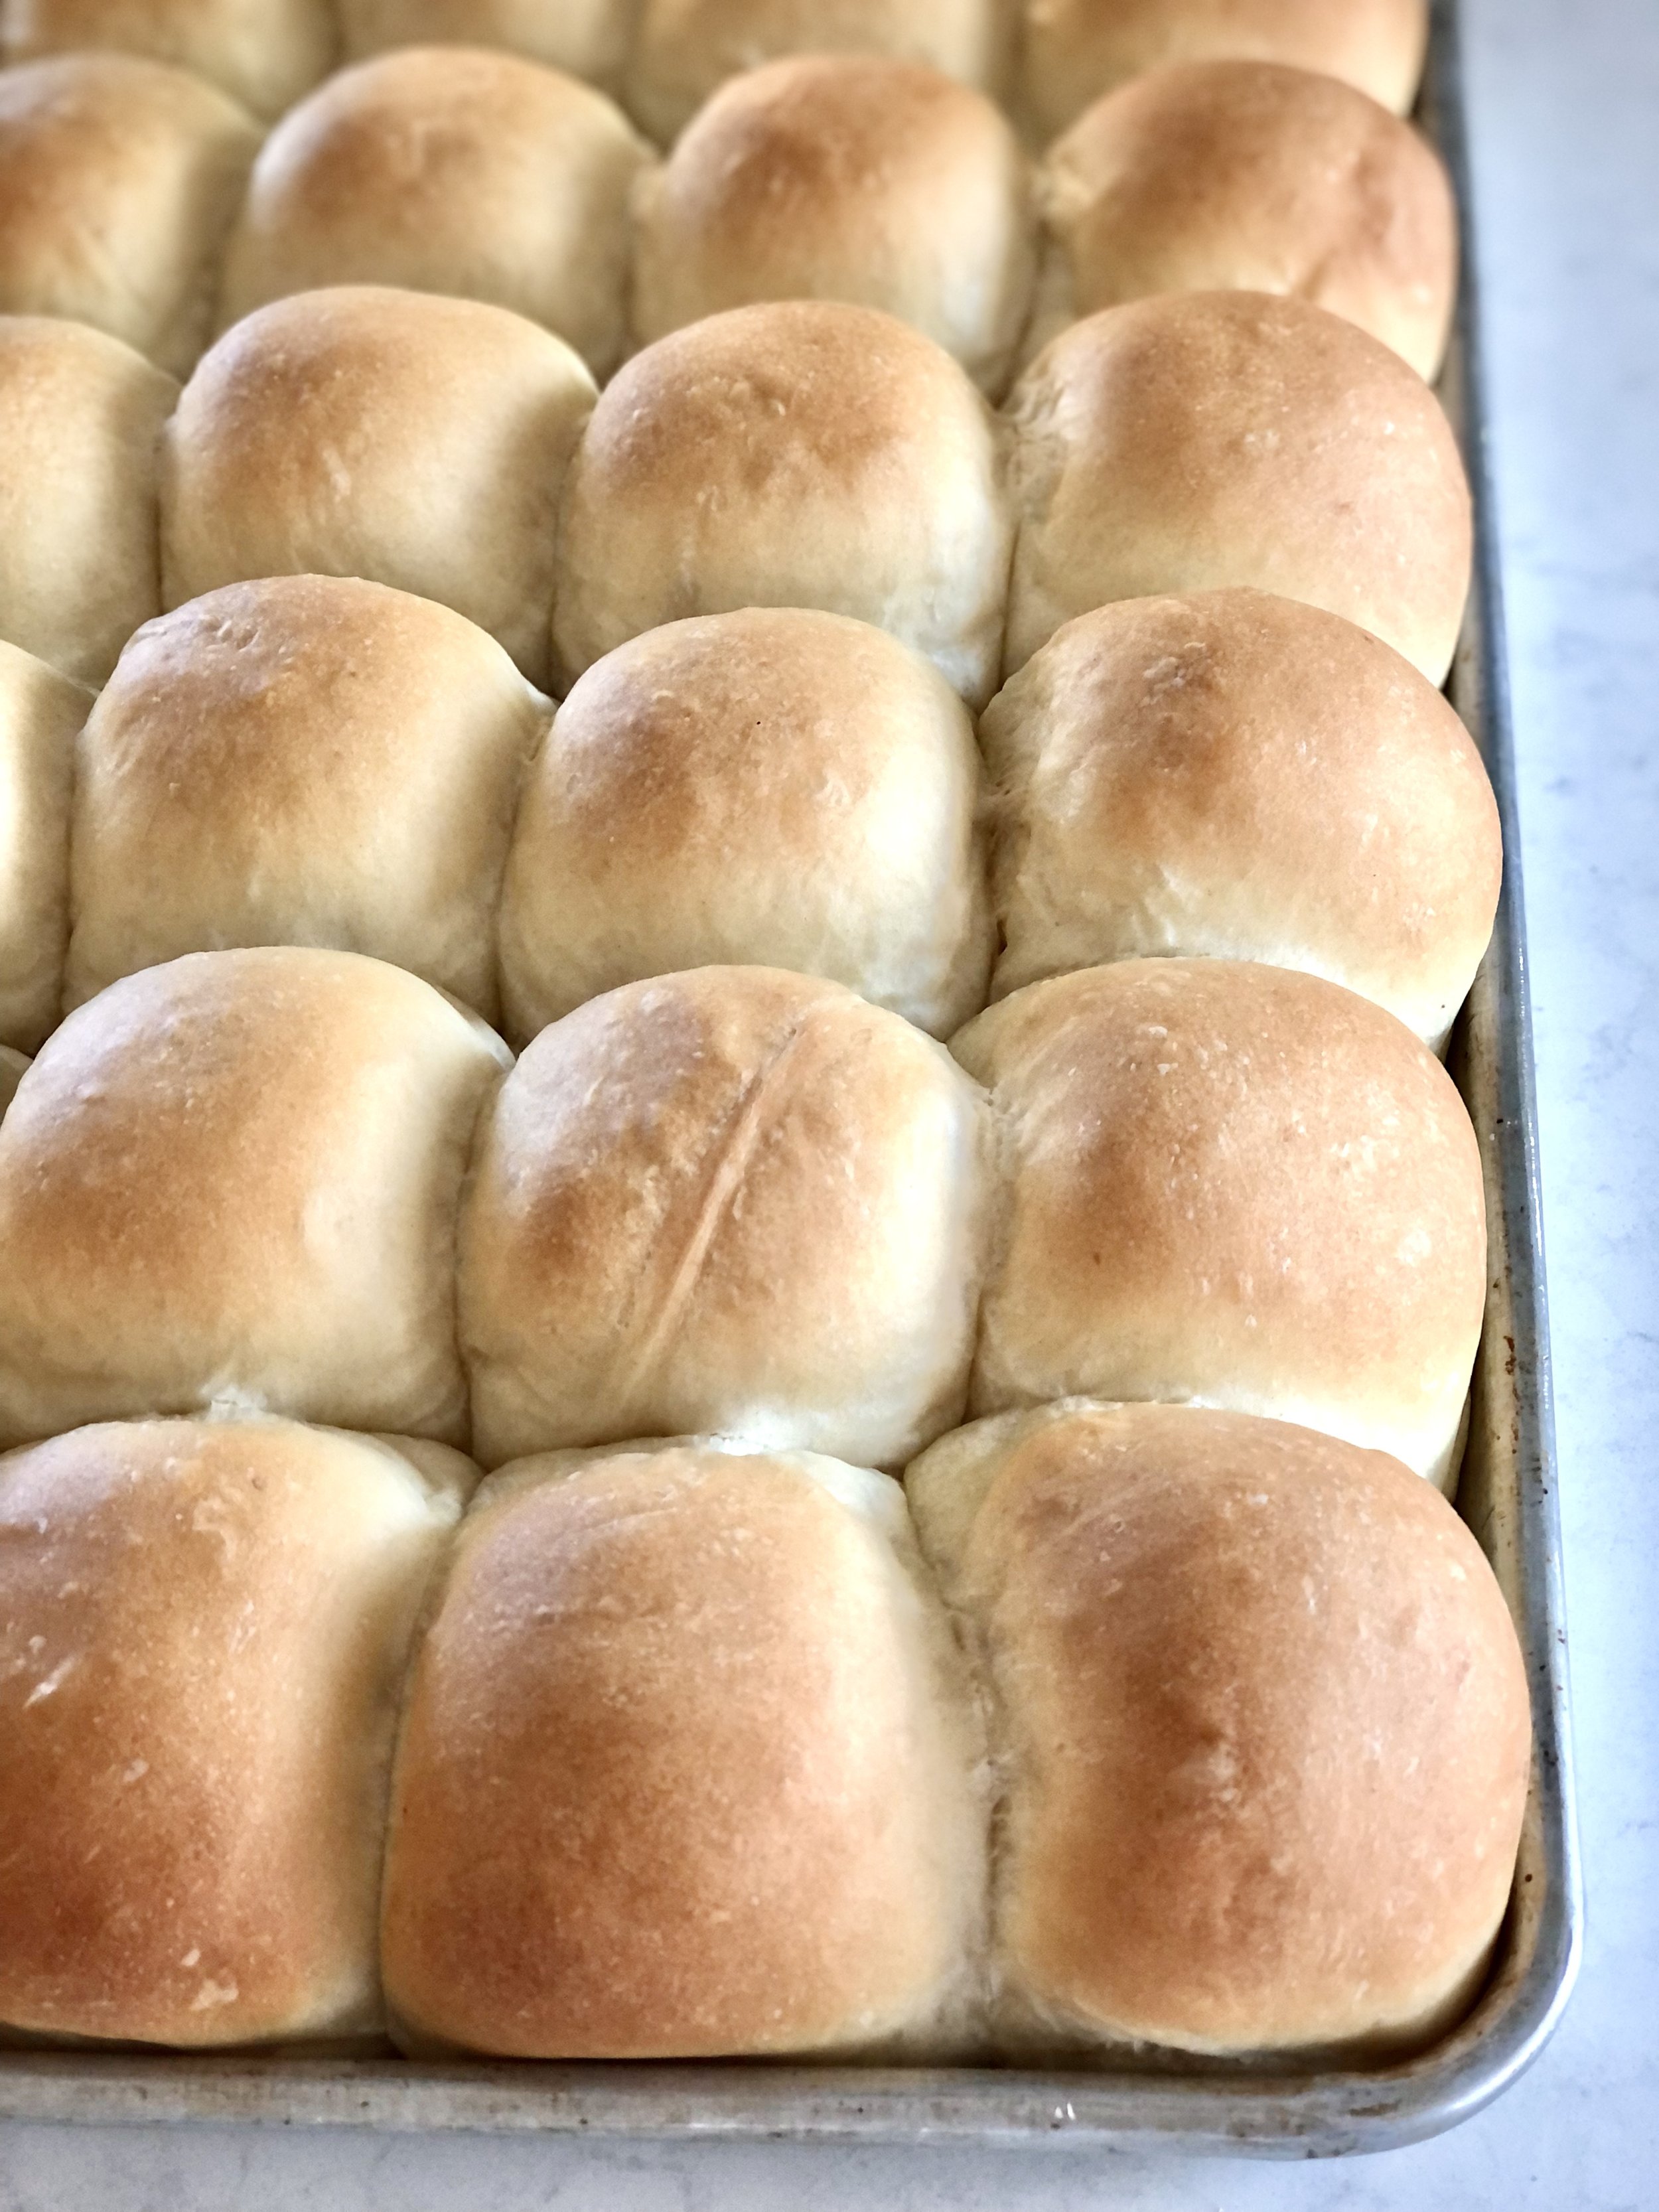
Morris House Rolls (Parker House Rolls)

Soft and fluffy, these rolls have become a staple for holiday dinners and everyday dinners. There are hardly ever any leftovers, no matter how many batches we make! It’s hard to resist delicious, buttery, homemade bread.

Originally called Parker House Rolls, we’ve since changed the name of these to Morris House Rolls since, well, we make them so pretty and slightly changed the method of Parker House Rolls. Their origin has something to do with some rolls made at a hotel, where any angry baker threw some unfinished rolls into the oven. Apparently these were the rather delicious result that stuck and became famous. The method nowadays involves rolls that are dipped in butter and folded in half before they’re baked. This all seems rather fussy and messy, so we’ve adapted these into a more classic dinner roll shape. Just as delicious without all the fuss.

These are wonderful as is, or sliced and used for sliders or other small sandwiches. These freeze beautifully, so you can always pull some out for an impromptu dinner side!

Sourdough Discard Friendly

This is a great recipe to use up some sourdough discard. Add up to 100g of discard and a bit more flour as needed.

Why Heat the Milk First?

Heating milk, often known as “scalding”, is a technique often found in older recipes. It involves heating the milk to at least 181°F / 83°C. It has a few different purposes, depending on what you’re making.

  • Kill Bacteria: Before milk was widely pasteurized, scalding milk helped to kill bacteria.

  • Enhance Flavor: Milk takes on flavors really well when heated, so scalding works well with recipes that use vanilla, spices, herbs, etc., such as ice creams and custards.

  • Help Bread Rise: Milk contains whey protein, which can weaken gluten. If gluten isn’t strong, bread won’t rise properly. Scalding milk deactivates the whey protein, for an optimal rise.

The final reason is the reason why milk is scalded in this recipe.

This post may contain affiliate links. If you make a purchase using these links, Jennyblogs may receive a small commission, at no extra cost to you. This helps to support Jennyblogs. For further information see the privacy policy. Grazie!

Recipe adapted from Food Network


Morris House Rolls

Ingredients:

  • 1 1/2 cups / 356g milk

  • 1/2 cup / 113g butter, plus more for brushing

  • 1/2 cup / 100g sugar

  • 2 1/4 tsp / 7g instant yeast

  • 1/2 cup / 119g warm water

  • 3 eggs

  • 1 1/2 tsp salt

  • 6 cups / 720g all-purpose flour

Directions:

Oven 350°F / 177°C. 1 baking sheet lined with parchment paper or silpat.

  1. In a small pan, bring milk to a simmer. Remove from heat and stir in butter and sugar until melted. Allow to cool.

  2. In a large mixing bowl or bowl of a stand mixer fitted with the dough hook, combine yeast, water, eggs, salt, half of the flour, and cooled milk mixture until smooth. Add remaining flour, 1/2 cup at a time, until a soft, smooth dough forms. Knead for a few minutes with the dough hook.

  3. Transfer dough to floured surface and knead about 5 more minutes by hand.

  4. Place dough in a lightly oiled bowl, flip once to coat in oil, cover, and let rest for about 1 hour at room temperature, or until doubled in size.

  5. Punch dough down and divide dough into about 30 pieces. This will work out to be about 55g per piece if you have a scale to weigh them. Roll each piece into a tight ball and place on prepared baking sheet.

  6. Cover and let rest at room temperature for about 30-45 minutes, or until dough balls are puffed and almost doubled in size.

  7. Bake in preheated oven for 18-20 minutes or until golden brown. Remove from oven and brush with melted butter, if desired.

Jenny’s Notes:

  • If using instant dry yeast, you will want to active it before adding it in with the other dough ingredients. Add active dry yeast and the warm water to a small bowl and let sit for 5-10 minutes or until bubbly and active, before proceeding by adding them in with the rest of the dough ingredients.

  • This is a great recipe to use up some sourdough discard. Add up to 100g of discard and a bit more flour as needed.

  • These are so good, we don’t usually brush them with the extra butter!

Morris (Parker) House Rolls
Yield 30 rolls
Author
Prep time
45 Min
Cook time
20 Min
Inactive time
1 H & 45 M
Total time
2 H & 50 M

Morris (Parker) House Rolls

Parker House Rolls, renamed Morris House Rolls, are fluffy, buttery dinner rolls that never fail to disappear.

Ingredients

Instructions

  1. Oven 350°F / 177°C. 1 baking sheet lined with parchment paper or silpat.
  2. In a small pan, bring milk to a simmer. Remove from heat and stir in butter and sugar until melted. Allow to cool.
  3. In a large mixing bowl or bowl of a stand mixer fitted with the dough hook, combine yeast, water, eggs, salt, half of the flour, and cooled milk mixture until smooth. Add remaining flour, 1/2 cup at a time, until a soft, smooth dough forms. Knead for a few minutes with the dough hook.
  4. Transfer dough to floured surface and knead about 5 more minutes by hand.
  5. Place dough in a lightly oiled bowl, flip once to coat in oil, cover, and let rest for about 1 hour at room temperature, or until doubled in size.
  6. Punch dough down and divide dough into about 30 pieces. This will work out to be about 55g per piece if you have a scale to weigh them. Roll each piece into a tight ball and place on prepared baking sheet.
  7. Cover and let rest at room temperature for about 30-45 minutes, or until dough balls are puffed and almost doubled in size.
  8. Bake in preheated oven for 18-20 minutes or until golden brown. Remove from oven and brush with melted butter, if desired.

Notes

  • If using instant dry yeast, you will want to active it before adding it in with the other dough ingredients. Add active dry yeast and the warm water to a small bowl and let sit for 5-10 minutes or until bubbly and active, before proceeding by adding them in with the rest of the dough ingredients.
  • This is a great recipe to use up some sourdough discard. Add up to 100g of discard and a bit more flour as needed.
  • These are so good, we don’t usually brush them with the extra butter!


Nutrition Facts

Calories

145.59

Fat

4.14 g

Sat. Fat

2.35 g

Carbs

21.88 g

Fiber

0.76 g

Net carbs

21.12 g

Sugar

4.01 g

Protein

3.68 g

Sodium

152.34 mg

Cholesterol

25.96 mg

Nutritional information is approximate. Based on 1 roll.

dinner roll, parker house rolls
bread, side
American
Did you make this recipe?
Tag @jennyblogsandbakes on instagram and hashtag it #jennyblogs

Cinnamon Raisin Swirl Bread

IMG_4773.jpg

Now that the festivities of Christmas are over, New Year's resolutions have begun, and the Christmas feasts are but a memory, (except for the reminder clinging to our hips), it's time to return to healthy eating.  Or at least, normal eating.  Some may go cold turkey on all foods that aren't celery, carrageenan-free almond milk, or sugar-free almond butter, but I prefer to go to all the warm, comforting foods.  Yes to breads, yes to soups, yes to cookies, yes to stir-frys. 

I'm all for trying new diets, not because I'm looking for a radical health-overthrow, but because I enjoy the challenge.  (And then the "forbidden" foods taste oh so marvelous after the fact.)  But I've also learned my lesson from Whole30January: This is not the time to try a restricting diet.  January can be long, cold, and sometimes a bit of a letdown after the holidays.  Add in the extra stress of not being able to eat just about anything you might fancy, and January just stretched into an eternity.  I'd rather get into the swing of normal routine and work before depriving my mind of body of certain foods.  Of course, this is just me.  And mostly the me that's still reeling from Whole30.  Find what works for you, without using that as an excuse to not give it your all.

Speaking of that bread earlier, how about a nice piece of Cinnamon Raisin Swirl toast??  

This post may contain affiliate links. If you buy something using these links, Jennyblogs may receive a small commission, at no extra cost to you. This helps to support Jennyblogs. For further information see the privacy policy. Grazie!

Recipe adapted from The Kitchn


Cinnamon Raisin Swirl Bread

Makes 2 9-inch loaves

IMG_4782.JPG

Ingredients:

  • 1 cup / 150g raisins

  • 1 cup / 237g hot water

  • 1 Tbsp / 10g active dry or instant yeast

  • 1 cup / 237g milk

  • 4 Tbsp / 56g melted butter or oil

  • 2 tsp / 9g salt

  • 5 1/2 - 6 cups / 660 - 720g all-purpose flour

  • 1/2 cup / 100g sugar

  • 1 1/2 Tbsp / 12g cinnamon

  • 1 egg

  • 2 tsp / 9g water

Directions:

Oven 375°F / 190°C.  2 greased loaf pans, approximately 9 x 5in / 23 x 13cm.  

IMG_4778.jpg
  1. Place raisins in a small bowl with the hot water and let plump for at least 10 minutes.  

  2. Drain water from raisins into the bowl of a stand mixer or large bowl.  Set raisins aside.  Sprinkle yeast over the water.  If you're using active dry, let the yeast sit for a few minutes until it starts to foam; if you're using instant, proceed to the next step. 

  3. Add milk, butter, and salt to yeast mixture and stir well.  Add 5 cups / 600g of flour, mixing to incorporate. 

  4. Switch to the dough hook or knead by hand on a lightly floured surface for 8 - 10 minutes, adding more flour as necessary.  At the end, test to see if your dough is ready by performing the window pane test (see notes.)  If not, continue to knead dough until it passes.  

  5. Toss raisins with a bit of flour to absorb any residual water.  Add to your dough, and knead until evenly distributed.  If using a stand mixer, you may find this easier to do by hand.  

  6. Place the dough in a large oiled bowl, cover, and place in a warm place to rise until doubled in size, about 1 hour.  

  7. Meanwhile, combine the sugar with the cinnamon in a small bowl.  

  8. Beat the egg with the 2 tsp water in another small bowl. 

  9. When the dough has risen, punch it down and divide into two equal pieces.  Starting with one half, roll dough into a rectangle about 9in / 23cm wide and at least 18in / 46cm long. 

  10. Brush the dough evenly with some of the egg wash, leaving one narrow end dry; sprinkle with half of the cinnamon sugar mixture.  Starting from the opposite short end, roll dough up and pinch the seam to seal. 

  11. Transfer to the loaf pan, placing seam side down.  Repeat with other half of dough.  

  12. Cover and let rise until doubled in size, about 30-45 minutes.   

  13. Bake in preheated oven for 30-40 minutes or until golden brown and internal temperature reads 185 - 190°F / 85-88°C. 

  14. Let bread cool 10 minutes before removing from pans and allowing to cool completely.

Jenny's Notes:

  • If the dough shrinks back on you as you're rolling it out, let it rest for a few minutes and try again.  

  • If you have leftover egg wash and cinnamon sugar, you can brush the top of the loaves with the egg wash and sprinkle with cinnamon sugar before baking.  

  • I used sourdough starter to make the loaves in the pictures.  I didn't leave enough time for rising, and thus you can see you the crumb is rather tight and dense.  Delicious nonetheless, but know that if you use instant yeast your loaves should be taller! 

  • Loaves can be frozen for later enjoyment.

  • If you really dig raisins, add more than 1 cup! Just be aware, though, if you start to add too many (I would imagine more than 2 cups) then they could start to weigh down your dough, not allowing for a full rise.  

cinnamon raisin bread, cinnamon raisin swirl bread, cinnamon toast,
Bread, Breakfast, Brunch
American
Yield: 24
Author: Jennyblogs
Print
Cinnamon Raisin Swirl Bread

Cinnamon Raisin Swirl Bread

Enriched white bread with swirls of cinnamon and plump raisins throughout.
Prep time: 1 hourCook time: 40 MTotal time: 1 H & 40 M

Ingredients:

  • 1 cup / 150g raisins
  • 1 cup / 237g hot water
  • 1 Tbsp / 10g active dry or instant yeast
  • 1 cup / 237g milk
  • 4 Tbsp / 56g melted butter or oil
  • 2 tsp salt
  • 5 1/2 - 6 cups / 660 - 720g all-purpose flour
  • 1/2 cup / 100g sugar
  • 1 1/2 Tbsp / 12g cinnamon
  • 1 egg
  • 2 tsp water

Instructions:

  1. Oven 375°F / 190°C. Grease 2 loaf pans, approximately 9 x 5in / 23 x 13cm.
  2. Place the raisins in a small bowl with the hot water and let plump for at least 10 minutes.
  3. Drain the water from the raisins into the bowl of a stand mixer or large bowl. Set the raisins aside. Sprinkle the yeast over the water. If you're using active dry, let the yeast sit for a few minutes until it starts to foam, if you're using instant, go ahead and proceed to the next step.
  4. Add the milk, butter, and salt to the yeast mixture and stir well. Add 5 cups / 600g of flour, mixing to incorporate. Switch to the dough hook or knead by hand on a lightly floured surface for 8 - 10 minutes, adding more flour as necessary. At the end, test to see if your dough is ready by performing the window pane test (see notes.) If not, continue to knead the dough until it passes.
  5. Toss the raisins with a bit of flour to absorb any residual water. Add to your dough, and knead until evenly distributed. If using a stand mixer, you may find this easier to do by hand.
  6. Place the dough in a large oiled bowl, cover, and place in a warm place to rise until doubled in size, about 1 hour.
  7. Meanwhile, combine the sugar with the cinnamon in a small bowl.
  8. Beat the egg with 2 tsp water in another small bowl.
  9. When the dough has risen, punch it down and divide into two equal pieces. Starting with one half, roll dough into a rectangle about 9in / 23cm wide and at least 18in / 46cm long.
  10. Brush the dough evenly with some of the egg wash, leaving one short end free, and sprinkle with half of the cinnamon sugar mixture. Starting from the opposite short end, roll the dough up and pinch the seam to seal.
  11. Transfer to the loaf pan, placing seam side down. Repeat with other half of dough.
  12. Cover and let rise until doubled in size, about 30-45 minutes.
  13. Bake in preheated oven for 30-40 minutes or until golden brown and internal temperature reads 185 - 190°F / 85-88°C.
  14. Let bread cool 10 minutes in pans before removing and allowing to cool completely.

Notes:

If the dough shrinks back on you as you're rolling it out, let it rest for a few minutes and try again. If you have leftover egg wash and cinnamon sugar, you can brush the top of the loaves with the egg wash and sprinkle with cinnamon sugar before baking. Loaves can be frozen for later enjoyment! If you really dig raisins, add more than 1 cup! Just be aware, though, if you start to add too many (I would imagine more than 2 cups) then they could start to weigh down your dough, not allowing for a full rise.

Calories

171.35

Fat (grams)

2.64

Sat. Fat (grams)

1.44

Carbs (grams)

33.09

Fiber (grams)

1.42

Net carbs

31.67

Sugar (grams)

7.96

Protein (grams)

4.10

Sodium (milligrams)

218.89

Cholesterol (grams)

13.56
Nutritional information is approximate. Based on 24 servings or 12 servings per loaf.
Did you make this recipe?
Tag @jenevamorris on instagram and hashtag it #jennyblogs
Created using The Recipes Generator
IMG_4777.jpg

Buttermilk Bread

This post may contain affiliate links. If you make a purchase using these links, Jennyblogs may receive a small commission, at no extra cost to you. This helps to support Jennyblogs. For further information see the privacy policy. Grazie!

What’s the first thing that comes to mind when someone says, "Buttermilk"?  

For me, that would be buttermilk pancakes.  The lightest and fluffiest of all pancakes.  If you live in the south, maybe that's buttermilk biscuits.  Maybe your favorite cake recipe or scone recipe calls for buttermilk.  Whatever it may be, these delectable food items all have one thing in common:  Their light crumb, a.k.a. fluffiness.  The high acidity in the buttermilk reacts with the leavening agent, like baking soda, thus creating a beautiful rise, and a nice, light product.  

I don't often have buttermilk on hand; I find it much easier to make my own as I always have milk and lemon juice/vinegar on hand.  Lemon juice or vinegar are both very acidic and will have a similar effect on the leavening agent.  However, there is something so satisfying about using true buttermilk in a recipe.  After all, Milk and Lemon Juice Pancakes don't sound nearly as appealing as Buttermilk pancakes.   

So, a trip to the store, a carton of buttermilk bought, pancakes made and eaten.  Now, there is only 7/8 of a carton of buttermilk left in your fridge.  The likelihood of making 7 or more batches of buttermilk pancakes before the buttermilk goes bad is, well, not likely.  (But if you do, let me know, I’ll come live at your house!)  

The question remains, what I can do with the rest of this buttermilk without being wasteful?  Make buttermilk bread! (Another side note, if you like to drink buttermilk straight, well then.  You just can't relate with our buttermilk overload predicament, can you?)  The fluffiness factor we were talking about earlier still plays a role in this bread.  So fluffy.  Makes great toast.  And did I mention french toast?  Now you can serve buttermilk french toast! Oh yes.  Full circle, baby.  Actually, I don't really know where the circle started, so it's hard to tell if we actually came full circle...

On to the recipe! 

Recipe adapted from Jane's Sweets and Baking Journal


Buttermilk Bread

Makes 2 approx. 9x5 inch loaves

Ingredients:

  • 5-6 cups / 620-740g all-purpose flour

  • 1 Tbsp / 9g instant yeast

  • 2 tsp / 10g salt

  • 2 cups / 474g buttermilk

  • 1 Tbsp / 20g maple syrup or honey

  • 2 Tbsp / 28g oil or melted butter

Directions:

Oven 375°F / 190°C.  Grease two approx. 9x5in / 24x13cm loaf pans.

  1. In a large bowl or bowl of a stand mixer fitted with the paddle attachment, place 5 cups of flour, yeast, and salt.  Mix together.  Add buttermilk, maple syrup, and oil, mixing well.  Switch to the dough hook if using a stand mixer.  

  2. Knead in the stand mixer or by hand on a lightly floured surface, until a smooth dough is formed, adding more flour as needed.   This should take about 5-7 minutes with a stand mixer, 10 minutes by hand.  If using a stand mixer, still knead a few rounds on a lightly floured surface at the end.

  3. Lightly grease a bowl and place your dough in it, flipping once so that all the dough is lightly coated in oil.  Cover with a clean towel or plastic wrap and place in a warm place to rise until doubled in volume, about one hour.  

  4. When bread has risen, punch or press down to degas it.  Dump back onto your floured surface and divide the dough into two even pieces, using a scale for accuracy.  

  5. Starting with one half, form dough into a ball by flattening in a small square, then folding 3-4 times to create a ball, stretching as you do to create some tension. Move to a part of your work surface that has minimal flour.  Place the ball between your two floured hands, loosely cupped. Move the ball between your hands in a circular motion while gently pulling the dough in a downward action.  The bottom of the dough should stick to your surface a bit, and as you gently stretch it down in a circular motion you are creating surface tension.  If the dough starts to tear lighten up on the pressure; the dough should look taught and smooth.  The surface tension will create a nice crust for your dough.  This is called shaping a "Boule."  If you're as confused as I would be reading this for the first time, this demonstration from King Arthur Flour is very helpful, the technique we're going for is shown starting at about 0:30.  

  6. Repeat with other half of dough.  Place towel or plastic wrap over the two boules and let rest for 15 minutes.

  7. Shape each round into a loaf and place in prepared pans.  Place back in a warm place to double, about 1 hour.  Preheat your oven towards the end of this time.  

  8. When dough has risen for the second time and the oven is hot, spray the inside walls of your oven with water to create steam.  A spray bottle works well.  Place loaves in oven and bake for 25-30 minutes, or until internal temperature reads 200-210°F / 93-99°C.  Allow to cool in pans for 10 minutes, then remove and transfer to a wire rack.  

bread, white bread, carbs, buttermilk, toast, french toast bread
Bread
American
Yield: 20
Author:

Buttermilk Bread

A soft white bread made extra fluffy with the use of buttermilk. Great for toast and french toast.
prep time: 40 Mcook time: 30 Mtotal time: 70 M

ingredients:

  • 5-6 cups / 620g-740g all-purpose flour
  • 1 Tbsp / 9g instant yeast
  • 2 tsp / 10g salt
  • 2 cups / 474g buttermilk
  • 1 Tbsp / 20g maple syrup or honey
  • 2 Tbsp / 28g oil or melted butter

instructions:

How to cook Buttermilk Bread

  1. Oven 375°F / 190°C. Grease two approx. 9x5in / 24x13cm loaf pans.
  2. In a large bowl or bowl of a stand mixer fitted with the paddle attachment, place 5 cups of flour, yeast, and salt. Mix together. Add buttermilk, maple syrup, and oil, mixing well. Switch to the dough hook if using a stand mixer.
  3. Knead in the stand mixer or by hand on a lightly floured surface, until a smooth dough is formed, adding more flour as needed. This should take about 5-7 minutes with a stand mixer, 10 minutes by hand. If using a stand mixer, still knead a few rounds on a lightly floured surface at the end.
  4. Lightly grease a bowl and place your dough in it, flipping once so that all the dough is lightly coated in oil. Cover with a clean towel or plastic wrap and place in a warm place to rise until doubled in volume, about one hour.
  5. When bread has risen, punch or press down to degas it. Dump back onto your floured surface and divide the dough into two even pieces, using a scale for accuracy.
  6. Starting with one half, form dough into a ball by flattening in a small square, then folding 3-4 times to create a ball, stretching as you do to create some tension. Move to a part of your work surface that has minimal flour. Place the ball between your two floured hands, loosely cupped. Move the ball between your hands in a circular motion while gently pulling the dough in a downward action. The bottom of the dough should stick to your surface a bit, and as you gently stretch it down in a circular motion you are creating surface tension. If the dough starts to tear lighten up on the pressure; the dough should look taught and smooth. The surface tension will create a nice crust for your dough. This is called shaping a "Boule." If you're as confused as I would be reading this for the first time, this demonstration from King Arthur Flour is very helpful, the technique we're going for is shown starting at about 0:30.
  7. Repeat with other half of dough. Place towel or plastic wrap over the two boules and let rest for 15 minutes.
  8. Shape each round into a loaf and place in prepared pans. Place back in a warm place to double, about 1 hour. Preheat your oven towards the end of this time.
  9. When dough has risen for the second time and the oven is hot, spray the inside walls of your oven with water to create steam. A spray bottle works well. Place loaves in oven and bake for 25-30 minutes, or until internal temperature reads 200-210°F / 93-99°C. Allow to cool in pans for 10 minutes, then remove and transfer to a wire rack.

Calories

161.19

Fat (grams)

2.00

Sat. Fat (grams)

0.28

Carbs (grams)

30.42

Fiber (grams)

1.12

Net carbs

29.30

Sugar (grams)

2.10

Protein (grams)

4.79

Sodium (milligrams)

239.83

Cholesterol (grams)

0.95
Nutritional information is approximate and based on 1 slice from 20 servings.
Created using The Recipes Generator

Whole Wheat Bread

This post may contain affiliate links. If you make a purchase using these links, Jennyblogs may receive a small commission, at no extra cost to you. This helps to support Jennyblogs. For further information see the privacy policy. Grazie!

Simple, delicious, whole wheat bread.  No batons, bread machines, or rocket scientists required.  Actually, if you have a bread machine your bread making life is probably a lot simpler than mine.  I enjoy working the bread with my own hands, though.  It's very therapeutic and gives you a nice upper body workout.   Which means you could then eat more bread, yes?

Anyway, this is a simple, versatile bread, good for sandwiches, toast, and...bread.  

Recipe adapted from The Frugal Girl


Whole Wheat Bread

Makes 2 approx. 9in / 23cm loaves

Ingredients:

  • 1 1/2 Tbsp / 14g instant yeast

  • 2 1/2 tsp / 13g salt

  • 3 cups / 384g whole wheat flour

  • 2 3/4 cups / 330g all-purpose flour

  • 2 1/3 cups / 552g warm water (about 110°F / 43°C)

  • 1/4 cup / 80g maple syrup or honey

  • 1/4 cup / 56g oil or melted butter

Directions:

Oven 350°F / 177°C.  Grease 2 approx. 9x5in / 23x13cm bread pans. 

  1. Combine yeast, salt, 1 cup / 128g whole wheat flour, and 1 cup / 120g all-purpose flour in the bowl of a stand mixer on low speed, or mix by hand.  

  2. Add warm water, maple syrup, and oil.  Mix until ingredients are combined, then increase speed to medium, beating for 3 minutes, or vigorously by hand.  

  3. Add remaining whole wheat flour and all-purpose flour until a soft but kneadable dough is formed.  

  4. Switch to dough hook and knead for 5-7 minutes, turning out on to a lightly floured surface to knead for 1-2 minutes more, until dough looks smooth and elastic. Or, knead by hand on a lightly floured surface for about 10 minutes.  

  5. Grease a large bowl and place dough in it.  Flip the dough over once so that both sides are lightly greased.  Cover bowl with a clean towel and place in a warm place to rise until doubled in volume, about 45-60 minutes.  

  6. When dough has risen, punch down and knead on a lightly floured surface for 4-5 minutes.  

  7. Separate dough into two equal pieces.  Roll or press one piece out into a small rectangle.  It does not have to be exact or very big, the width of it should be a touch smaller than your bread pan, or 9 inches.  Starting from the short end, roll the dough up and place in your prepared pan.  Repeat with second piece.  

  8. Place towel back over loaves and let rise until doubled, about 30-45 minutes.  

  9. When loaves have risen, bake for about 30 minutes.  They should sound hollow when tapped on the bottom or the internal temperature should read about 205°F / 96°C.  

  10. Cool in pans 10 minutes before removing and allowing to cool fully.  

Jenny's Notes:

  • If you use oil to make this bread, it will be dairy-free. If you use oil and maple syrup, it will also be vegan.

  • I have also made this bread with great success substituting part of the all-purpose flour with wheat germ.  Gives it an extra nutty flavor profile.  

  • The rolling step creates surface tension in the bread, and therefore a prettier loaf.  I only eat pretty loaves.  ;)

vegan, dairy-free, whole wheat bread, wheat germ, honey, maple syrup, toast, french toast, whole wheat sandwich bread, homemade bread, loaves
Bread
American
Yield: 20
Author:

Whole Wheat Bread

Classic everyday whole wheat bread, great for sandwiches, toast, or anyway you like to eat bread!
prep time: 35 Mcook time: 30 Mtotal time: 65 M

ingredients:

  • 1 1/2 Tbsp / 14g instant yeast
  • 2 1/2 tsp / 13g salt
  • 3 cups / 384g whole wheat flour
  • 2 3/4 cups / 330g all-purpose flour
  • 2 1/3 cups / 552g warm water (about 110°F / 43°C)
  • 1/4 cup / 80g maple syrup or honey
  • 1/4 cup / 56g oil or melted butter

instructions:

How to cook Whole Wheat Bread

  1. Oven 350°F / 177°C. Grease 2 approx. 9x5in / 23x13cm bread pans.
  2. Combine yeast, salt, 1 cup / 128g whole wheat flour, and 1 cup / 120g all-purpose flour in the bowl of a stand mixer on low speed, or mix by hand.
  3. Add warm water, maple syrup, and oil. Mix until ingredients are combined, then increase speed to medium, beating for 3 minutes, or vigorously by hand.
  4. Add remaining whole wheat flour and all-purpose flour until a soft but kneadable dough is formed.
  5. Switch to dough hook and knead for 5-7 minutes, turning out on to a lightly floured surface to knead for 1-2 minutes more, until dough looks smooth and elastic. Or, knead by hand on a lightly floured surface for about 10 minutes.
  6. Grease a large bowl and place dough in it. Flip the dough over once so that both sides are lightly greased. Cover bowl with a clean towel and place in a warm place to rise until doubled in volume, about 45-60 minutes.
  7. When dough has risen, punch down and knead on a lightly floured surface for 4-5 minutes.
  8. Separate dough into two equal pieces. Roll or press one piece out into a small rectangle. It does not have to be exact or very big, the width of it should be a touch smaller than your bread pan, or 9 inches. Starting from the short end, roll the dough up and place in your prepared pan. Repeat with second piece.
  9. Place towel back over loaves and let rise until doubled, about 30-45 minutes.
  10. When loaves have risen, bake for about 30 minutes. They should sound hollow when tapped on the bottom or the internal temperature should read about 205°F / 96°C.
  11. Cool in pans 10 minutes before removing and allowing to cool fully.

NOTES:

If you use oil to make this bread, it will be dairy-free. If you use oil and maple syrup, it will also be vegan. I have also made this bread with great success substituting part of the all-purpose flour with wheat germ. Gives it an extra nutty flavor profile. The rolling step creates surface tension in the bread, and therefore a prettier loaf.

Calories

162.77

Fat (grams)

3.50

Sat. Fat (grams)

0.30

Carbs (grams)

29.38

Fiber (grams)

2.69

Net carbs

26.69

Sugar (grams)

2.54

Protein (grams)

4.53

Sodium (milligrams)

254.58

Cholesterol (grams)

0.00
Nutritional information is approximate and based on 1 slice from a 10-slice loaf.
Created using The Recipes Generator

Pumpkin Cinnamon Swirl Bread

Pumpkin Bread. No, not that wonderful, dense, quick-bread pumpkin bread, but a light, yeasted bread made with PUMPKIN and spiced with nutmeg and ginger!!! And a beautiful cinnamon swirl. It makes a-may-zing toast. I think I say that about all my bread recipes. But it’s the truth. And I love toast.

Do you want to know something really sad, though? (You’re maybe thinking, uh no, scrolllll.) I’m blogging about this bread, and I can’t even eat it. (By choice, I guess I like to punish my body??) I’m going to tell you about it.

Ever heard of Whole30?  Me neither, up until last year.  Actually, New Year's Eve.  (Yes, only 2 weeks ago.  I know, I know, those "last year" jokes are so old, but I still get SO much entertainment out of them.  Too much.)  Anyway, I read about the Whole30 in an email from this informative and entertaining fitness site called Greatist.   Like all normal people, my first thought when I see things like ice cream and strange diets is to say, "I WANT TO BE A PART OF THAT."  Actually, I prefer the ice cream to be a part of me, meaning I ate it. 

I am not normally a spontaneous person by any means, but two days later I had commenced my very own #Whole30January.  Without even reading all the way through the guidelines.  It's almost easier to list what you can eat than what you can't.  But I'll start with what you can't, just because it's fun and I like to complain about it.  It's not even all that hard.  Especially with a buddy.  Just ask my Mom, she just loves doing this with me.

Not allowed:

  1. grain (not even quinoa)

  2. dairy (guess that ice cream is not going to become a part of me after all)

  3. sugar (say no to stevia)

  4. soy (watch out for sneaky ingredients like soy lecithin)

  5. alcohol (put down the vanilla extract)

  6. legumes (think beans and peanuts)

  7. sketchy preservatives like carageenan

That leaves you with veggies, fruits, eggs, nuts, meat, and all the sadness you want.  But you may not take any of those approved items and combine them to create something in the "cheat" category.  For example, you cannot combine eggs and bananas and pour it onto a griddle because that would be a pancake.  The goal is to break you of unhealthy relationships with food.  So instead of replacing everything you normally eat with healthier versions (because at the end of the 30 days you will most likely go back to the exact same way you ate before, and then nothing has changed) the goal is to explore and create new delicious and nutritious (and sad) food.  Ha ok I'm done being sardonic.  If you want to read more about Whole30, click here.  

So in the midst of these January blues and food sadness, I will share with you this recipe for pumpkin cinnamon swirl bread so you can eat it in my stead.  While you're at it, would you also eat some cheese and every other kind of bread that exists for me?  Thanks. 

This post may contain affiliate links. If you buy something using these links, Jennyblogs may receive a small commission, at no extra cost to you. This helps to support Jennyblogs. For further information see the privacy policy. Grazie!

Recipe adapted from Cooking Classy


Pumpkin Cinnamon Swirl Bread

Makes 1 loaf

Ingredients:

For the Bread

  • 2 1/4 tsp / 7g active dry yeast

  • 1/4 cup / 60g warm water, 110°F / 43°F

  • 1/4 cup / 50g + 1/2 tsp sugar

  • 1/4 cup / 60g warm milk, 110°F / 43°C

  • 2 Tbsp / 42g molasses

  • 3/4 tsp salt

  • 1 Tbsp / 14g oil

  • 1/4 tsp nutmeg

  • 1/4 tsp ginger

  • 1 egg

  • 1 cup / 246g pumpkin puree

  • 3 1/2 - 4 cups / 420g - 480g all-purpose flour

For the Cinnamon Swirl

  • 1 1/2 Tbsp / 21g butter, melted

  • 1/3 cup / 67g brown sugar

  • 2 tsp cinnamon

Directions:

Make the Bread

Oven 375°F / 190°C.  1 greased bread pan, approximately 9x5in / 23x13cm.

  1. In the bowl of a stand mixer combine yeast, water, and 1/2 tsp of sugar.  Allow to sit until yeast starts to bubble, about 5 minutes.

  2. Stir in the milk, molasses, remaining sugar, salt, oil, nutmeg, ginger, egg, and pumpkin until combined. 

  3. Switch to a dough hook and slowly add flour.  Continue adding flour until a soft, but not too sticky dough is achieved. 

  4. Turn dough out onto a lightly floured surface and knead for 1-2 minutes. 

  5. Place in an oiled bowl, flip so that both sides are oiled, and cover with a towel. Allow to rise in a warm place until doubled in size, about 1 hour. 

  6. While the bread is rising, whisk together brown sugar and cinnamon in a small bowl.  Set aside.

  7. When the bread is doubled in size, punch down and turn out onto a lightly floured surface.  Roll out into a rectangle, about 22x8in / 56x20cm. 

  8. Spread melted butter over dough, going within 1/2in / 1cm of edge.  Sprinkle cinnamon sugar mixture evenly over butter.

  9. Starting from one of the short sides (the approximate 8in / 20cm) roll dough into a loaf.  Place in prepared loaf pan seam side down. 

  10. Cover with a towel and let rise again until doubled in size, about 45 minutes. 

  11. Bake in preheated oven for 35-40 minutes, or until bread sounds hollow to the tap and an internal temperature reaches about 190°F / 88°C. 

Jenny's Notes:

  • If using instant yeast instead of instant active dry yeast, you can skip step 1. and add all the ingredients from step 1. and 2. together, then proceed to step 3. The reason for this is because active dry yeast is dried and needs to be reactivated in some warm liquid and a bit of sugar before adding to the rest of the ingredients. Instant yeast is ready to be added in without any extra prep.

  • This bread is delicious toasted!  And if you're really a pumpkin fan, might I mention pumpkin butter?

yeasted bread, yeast, pumpkin puree, canned pumpkin, pumpkin bread, cinnamon swirl
bread, breakfast
American
Yield: 12-14
Author:

Pumpkin Cinnamon Swirl Bread

Light, yeasted pumpkin bread spiced with ginger and nutmeg with a beautiful cinnamon swirl.
prep time: 50 Mcook time: 40 Mtotal time: 90 M

ingredients:

For the Bread
  • 2 1/4 tsp / 7g active dry yeast
  • 1/4 cup / 60g warm water, 110°F / 43°F
  • 1/4 cup / 50g + 1/2 tsp sugar
  • 1/4 cup / 60g warm milk, 110°F / 43°C
  • 2 Tbsp / 42g molasses
  • 3/4 tsp salt
  • 1 Tbsp / 14g oil
  • 1/4 tsp nutmeg
  • 1/4 tsp ginger
  • 1 egg
  • 1 cup / 246g pumpkin puree
  • 3 1/2 - 4 cups / 420g - 480g all-purpose flour
For the Cinnamon Swirl
  • 1 1/2 Tbsp / 21g butter, melted
  • 1/3 cup / 67g brown sugar
  • 2 tsp cinnamon

instructions:

How to cook Pumpkin Cinnamon Swirl Bread

Make the Bread
  1. Oven 375°F / 190°C. 1 greased bread pan, approximately 9x5in / 23x13cm.
  2. In the bowl of a stand mixer combine yeast, water, and 1/2 tsp of sugar. Allow to sit until yeast starts to bubble, about 5 minutes.
  3. Stir in the milk, molasses, remaining sugar, salt, oil, nutmeg, ginger, egg, and pumpkin until combined.
  4. Switch to a dough hook and slowly add flour. Continue adding flour until a soft, but not too sticky dough is achieved.
  5. Turn dough out onto a lightly floured surface and knead for 1-2 minutes.
  6. Place in an oiled bowl, flip so that both sides are oiled, and cover with a towel. Allow to rise in a warm place until doubled in size, about 1 hour.
  7. While the bread is rising, whisk together brown sugar and cinnamon in a small bowl. Set aside.
  8. When the bread is doubled in size, punch down and turn out onto a lightly floured surface. Roll out into a rectangle, about 22x8in / 56x20cm.
  9. Spread melted butter over dough, going within 1/2in / 1cm of edge. Sprinkle cinnamon sugar mixture evenly over butter.
  10. Starting from one of the short sides (the approximate 8in / 20cm) roll dough into a loaf. Place in prepared loaf pan seam side down.
  11. Cover with a towel and let rise again until doubled in size, about 45 minutes.
  12. Bake in preheated oven for 35-40 minutes, or until bread sounds hollow to the tap and an internal temperature reaches about 190°F / 88°C.

NOTES:

If using instant yeast instead of instant active dry yeast, you can skip step 1. and add all the ingredients from step 1. and 2. together, then proceed to step 3. The reason for this is because active dry yeast is dried and needs to be reactivated in some warm liquid and a bit of sugar before adding to the rest of the ingredients. Instant yeast is ready to be added in without any extra prep.

Calories

219.22

Fat (grams)

3.60

Sat. Fat (grams)

1.28

Carbs (grams)

41.35

Fiber (grams)

2.07

Net carbs

39.28

Sugar (grams)

9.02

Protein (grams)

5.33

Sodium (milligrams)

170.35

Cholesterol (grams)

19.66
Nutritional information is approximate and based on 12 servings.
Created using The Recipes Generator
What lurks in the darkness...

What lurks in the darkness...


IPA Pretzel Bread

IMG_4049.JPG
This post was written from the London Heathrow Airport!

This post was written from the London Heathrow Airport!

Bread is delicious. #FACT.

Then when you make pretzel bread and add beer to it, it becomes extra delicious. #FACTZ. And that’s exactly what this bread is, boiled beer bread.

Pretzel bread is made simply by boiling bread dough in baking soda water. This particular recipe adds a bit of beer to the boiling water, because if you’re going to make beer bread, you might as well go all out!

Beer in baking

Beer can be added to all kinds of desserts from cookies and brownies to cakes and breads, even caramels and candies! It creates tender baked goods, can help raise, and of course, adds wonderful flavor notes. One of the beauties of baking with beer (and wine!) is choosing from all the different varieties, as each will lend its own unique flavor.

If you’re new to baking with beer, you’ll probably want to start with the recipe’s suggested beer, an Indian Pale Ale if you decide to make this bread. Once you start to get an idea of how beer acts and tastes in recipes, you can begin to branch out and try your favorite beers to find matches with different baked goods. For example, stouts (think Guinness) are lovely in chocolate cake. A staple of a bakery I worked in was a Chocolate Guinness Cake with Cream Cheese Frosting. Actually, the photos of the bread you see in this post are made with an American Pale Ale from Short’s Brewery, not an Indian Pale Ale. But they’re similar, I don’t know I’d notice the difference between breads made with an IPA or an APA. Just stay away from light beers, those are watery and not good for baking.

If you don’t like beer, chances are you will still like desserts and breads made with beer. Most of the alcohol gets baked out as well, so if it’s more the alcohol you avoid that can be reassuring. However, you’ll probably want to make your own informed choice on that as there will still be trace amounts of alcohol even after baking/cooking. :)

This post may contain affiliate links. If you make a purchase using these links, Jennyblogs may receive a small commission, at no extra cost to you. This helps to support Jennyblogs. For further information see the privacy policy. Grazie!

Recipe adapted from Little Market Kitchen


IPA Pretzel Bread

Makes two loaves

Ingredients:


    •    1/2 cup / 119g warm water (about 105-110 Fahrenheit)
    •    2 1/4 tsp / 7g active dry yeast
    •    1 1/2 cups (12 oz) / 356g IPA or beer of choice, room temperature, divided into 1 cup and 1/2 cup
    •    4 cups / 480g bread flour or all-purpose flour
    •    1 Tbsp / 13g sugar
    •    1 tsp / 5g salt
    •    3 Tbsp / 42g oil
    •    10 cups / 2,370g water
    •    1/2 cup / 110g baking soda
    •    1 egg yolk beaten with 1 Tbsp / 15g water
    •    coarse or flaked salt, for sprinkling


Directions:

Oven preheated to 425°F / 218°C. Line a baking sheet with parchment paper or Silpat.

IMG_4056.JPG
  1. Pour warm water into the bowl of a stand mixer or large bowl.  Sprinkle yeast over the water and let sit for about 10 minutes, or until bubbly and frothy.

  2. In a separate bowl, whisk together flour, sugar, and salt. 

  3. Once the yeast is active, add the flour mixture, then the oil, then 1 cup / 237g of the beer.  Mix in a stand mixer with dough hook or knead by hand until a soft, but not sticky, dough forms, about 10 minutes.  If it's too soft, add more flour, or if it's too dry/stiff, you can steal a bit of beer from the reserved 1/2 cup / 119g. 

  4. Give the dough a few kneads by hand if a stand mixer was used and place in a large lightly oiled bowl. Flip dough once so both sides are oily. Cover with a clean towel or plastic wrap and place in a warm place to rise until doubled in size, about 1 hour.  

  5. In a large pot, combine water, remaining 1/2 cup / 119g beer, and baking soda.  Bring to a boil. 

  6. Once bread has doubled in size, punch down and divide in half.  Shape each half into a round loaf. 

  7. Working with one loaf at a time, lower into the boiling water using a large sieve or spatula, boil for 30 seconds and flip in the water once.  Remove and place on prepared baking sheet. Repeat with second loaf. 

  8. Brush the loaves with the egg yolk and water mixture, sprinkle with salt. 

  9. Bake in preheated oven for 20 minutes then place a piece of tinfoil on top to keep the bread from darkening too much.  Bake for an additional 3-8 minutes until a baking thermometer inserted near center reads at least 190°F / 88°C. 

  10. Allow to cool, slice, and enjoy!

Jenny’s Notes:

  • If the dough is too soft when trying to create a round and it won’t hold its shape, add flour a bit at a time until it will.  Dough that relaxes a little bit out of shape is ok, just keep in mind that adding too much flour will create a dry bread. It’s about finding the balance between creating a soft dough yet strong enough to hold it’s shape. Properly kneaded dough is also important in a free form loaf holding its shape.

  • This bread makes excellent toast. I think I say that about every bread recipe. Toast is so good.

beer bread, pretzel bread, IPA bread, baking with beer,
bread
American
Yield: 16
Author:
IPA Pretzel Bread

IPA Pretzel Bread

Pretzel bread and beer bread combine in this flavorful bread made with India Pale Ale.
Prep time: 35 MinCook time: 28 Mininactive time: 1 H & 10 MTotal time: 2 H & 12 M

Ingredients

Instructions

  1. Oven preheated to 425°F / 218°C. Line a baking sheet with parchment paper or Silpat.
  2. Pour warm water into the bowl of a stand mixer or large bowl. Sprinkle yeast over the water and let sit for about 10 minutes, or until bubbly and frothy.
  3. In a separate bowl, whisk together flour, sugar, and salt.
  4. Once the yeast is active, add the flour mixture, then the oil, then 1 cup / 237g of the beer. Mix in a stand mixer with dough hook or knead by hand until a soft, but not sticky, dough forms, about 10 minutes. If it's too soft, add more flour, or if it's too dry/stiff, you can steal a bit of beer from the reserved 1/2 cup / 119g.
  5. Give the dough a few kneads by hand if a stand mixer was used and place in a large lightly oiled bowl. Flip dough once so both sides are oily. Cover with a clean towel or plastic wrap and place in a warm place to rise until doubled in size, about 1 hour.
  6. In a large pot, combine water, remaining 1/2 cup / 119g beer, and baking soda. Bring to a boil.
  7. Once bread has doubled in size, punch down and divide in half. Shape each half into a round loaf.
  8. Working with one loaf at a time, lower into the boiling water using a large sieve or spatula, boil for 30 seconds and flip in the water once. Remove and place on prepared baking sheet. Repeat with second loaf.
  9. Brush the loaves with the egg yolk and water mixture, sprinkle with salt.
  10. Bake in preheated oven for 20 minutes then place a piece of tinfoil on top to keep the bread from darkening too much. Bake for an additional 3-8 minutes until a baking thermometer inserted near center reads at least 190°F / 88°C.
  11. Allow to cool, slice, and enjoy!

Notes:

If the dough is too soft when trying to create a round and it won’t hold its shape, add flour a bit at a time until it will.  Dough that relaxes a little bit out of shape is ok, just keep in mind that adding too much flour will create a dry bread. It’s about finding the balance between creating a soft dough yet strong enough to hold it’s shape. Properly kneaded dough is also important in a free form loaf holding its shape.

Calories

149.06

Fat (grams)

3.44

Sat. Fat (grams)

0.35

Carbs (grams)

23.58

Fiber (grams)

0.84

Net carbs

22.74

Sugar (grams)

0.91

Protein (grams)

4.04

Sodium (milligrams)

2046.95

Cholesterol (grams)

11.53
Nutritional information is approximate; based on 1 slice, if each loaf yields 8 slices.
Did you make this recipe?
Tag @jennyblogsandbakes on instagram and hashtag it #jennyblogs

Baked Egg Baguettes

Happiness is, a good piece of bread and a stairway in Paris.

"How can you tell how good bread is without tasting it? Not the smell, not the look, but the sound of the crust. Listen. [bread crackles] Oh, symphony of crackle. Only great bread sound this way."             - Colette, Ratatouille

Disclaimer: This is not a bread recipe, but it involves using your favorite crusty bread...think baguettes, with their wonderful crisp outside, soft and chewy inside...oh yes.  I have not been everywhere in the world or tried all the bread, not even close, but of the places I have been, France has the best bread.  And pastries.  And butter.  And lots of other things.  The best part?  You can go to just about any bakery, even the world renowned, and never pay more than 1.50 euro.  That's less than $2 for the world's best bread.  Unfortunately I'm not in France right now, so a package of demi-baguettes will have to do for this recipe. 

This post may contain affiliate links. If you make a purchase using these links, Jennyblogs may receive a small commission, at no extra cost to you. This helps to support Jennyblogs. For further information see the privacy policy. Grazie!

Recipe adapted from Spoon Fork Bacon


Baked Egg Baguettes

Serves 4-8 (depending on if you want to eat a whole mini baguette or cut them in half)

Ingredients:

  • 4 demi-baguettes

  • 5 eggs

  • 1/3 cup / 79g milk

  • 1/4 small white onion, diced

  • 2-3 green onions, chopped

  • 3 oz / 85g smoked Gouda cheese, shredded

  • salt and pepper, to taste

Directions:

Oven preheated to 350°F / 177°C

  1. Cut out the middle of each baguette, making a V shape, like a canoe shape. 

  2. Whisk together eggs and milk, beating lightly.  Add in onion, green onion, and half of the cheese.  Lightly salt and pepper.  Divide evenly among the baguettes.  Top each with the remaining cheese. 

  3. Place on a baking sheet or dish and bake for 20-25 minutes, until golden and the center is set and slightly puffed up.  Allow to cool for a few minutes, then slice and serve. 

Jenny's Notes:

  • This is a very quick and easy recipe to execute!  You can add or adjust the add-ins as you wish.  I also enjoy adding chopped spinach, mushrooms, diced red or green onion, or sun-dried tomatoes. 

  • Substitute the smoked gouda with any of your favorite cheeses!

baked egg boats, egg bake, make ahead breakfast
breakfast, brunch
American
Yield: 4-8
Author:
Baked Egg Baguettes

Baked Egg Baguettes

Hollowed out baguettes filled and baked with cheesy eggs and onions, easy to make and delicious for breakfast or anytime!
Prep time: 20 MinCook time: 25 MinTotal time: 45 Min

Ingredients

Instructions

  1. Oven preheated to 350°F / 177°C
  2. Cut out the middle of each baguette, making a V shape, like a canoe shape.
  3. Whisk together eggs and milk, beating lightly. Add in onion, green onion, and half of the cheese. Lightly salt and pepper. Divide evenly among the baguettes. Top each with the remaining cheese.
  4. Place on a baking sheet or dish and bake for 20-25 minutes, until golden and the center is set and slightly puffed up. Allow to cool for a few minutes, then slice and serve.

Notes

  • This is a very quick and easy recipe to execute!  You can add or adjust the add-ins as you wish.  I also enjoy adding chopped spinach, mushrooms, diced red or green onion, or sun-dried tomatoes. 
  • Substitute the smoked gouda with any of your favorite cheeses!

Nutrition Facts

Calories

730.69

Fat

18.57 g

Sat. Fat

7.2 g

Carbs

123.02 g

Fiber

5.53 g

Net carbs

117.5 g

Sugar

13.74 g

Protein

36.81 g

Sodium

1854.79 mg

Cholesterol

231.28 mg

Nutritional information is approximate, based on eating 1 whole demi-baguette.

Did you make this recipe?
Tag @jennyblogsandbakes on instagram and hashtag it #jennyblogs